Transforming your garage into a functional and aesthetically pleasing space often requires a little creativity and ingenuity. One effective way to enhance the usability of this often-overlooked area is by building a raised floor. Whether you’re looking to create a dedicated workspace, improve insulation, or simply elevate your storage options, constructing a raised floor can redefine your garage’s purpose. In this article, we will guide you through the process step-by-step, offering practical tips and essential considerations to help you achieve a successful and durable raised flooring solution. Let’s roll up our sleeves and unlock the potential of your garage!
Table of Contents
- Choosing the Right Materials for a Durable Raised Floor
- Planning the Layout: Essential Steps for a Functional Garage Space
- Installation Techniques for a Professional Finish
- Finishing Touches: Enhancing Aesthetics and Functionality
- Q&A
- The Way Forward

Choosing the Right Materials for a Durable Raised Floor
When constructing a raised floor, the choice of materials plays a pivotal role in ensuring its longevity and functionality. It is essential to select materials that can withstand the rigors of a garage environment, including exposure to moisture, temperature fluctuations, and potential heavy loads. High-quality plywood is often recommended for the subfloor, providing a solid, stable base. Additionally, consider incorporating pressure-treated wood for structural components that come into direct contact with the ground, preventing rot and decay. Non-corrosive materials, such as galvanized steel brackets and screws, should also be prioritized to enhance durability.
In addition to the structural integrity, aesthetics should not be overlooked. If the raised floor will be utilized for projects that involve spills or stains, opting for waterproof vinyl flooring or concrete tiles can be an excellent choice. For a more insulated feel, foam underlayment can provide additional comfort while acting as a moisture barrier. Below is a simple comparison of materials to consider for your raised floor:
| Material | Durability | Cost-effectiveness | Aesthetic Appeal |
|---|---|---|---|
| Plywood | High | Moderate | Natural finish |
| Concrete tiles | Very High | High | Modern look |
| Vinyl flooring | Moderate | Low | Variety of styles |
| Pressure-treated wood | High | Moderate | Rustic charm |

Planning the Layout: Essential Steps for a Functional Garage Space
Creating a well-organized and functional garage space begins with a strategic layout plan. Start by assessing the available space and determining its primary purpose—whether it’s for parking vehicles, storage, or a workshop. Prioritize the most frequently used items by placing them within easy reach, ideally near the garage entrance. Consider the following aspects while planning your layout:
- Storage Zones: Designate specific areas for tools, seasonal items, or sports equipment.
- Workstation Placement: Position workbenches or crafting stations near power outlets for convenience.
- Clear Pathways: Ensure there’s enough space to move around without obstruction.
Once you have a plan, it’s crucial to consider elevation and flooring. Building a raised floor can enhance organization by creating additional storage space underneath. When deciding on materials, take into account durability and ease of maintenance. For instance, you might want to explore options like plywood or composite decking. Here’s a quick comparison of potential materials:
| Material | Durability | Cost | Maintenance |
|---|---|---|---|
| Plywood | Moderate | Low | Easy |
| Composite Decking | High | Medium | Low |
| OSB (Oriented Strand Board) | Moderate | Very Low | Medium |
Installation Techniques for a Professional Finish
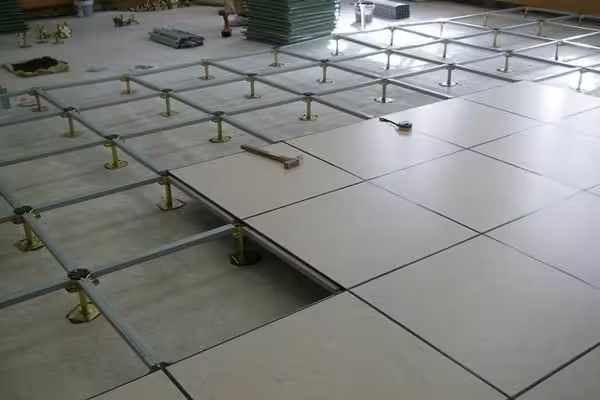
Achieving a professional finish when building a raised floor in your garage requires careful planning and precise execution. Start by ensuring that you have all the necessary materials at hand, including high-quality plywood, floor joists, and appropriate fasteners. Before you begin, it can be beneficial to create a detailed layout plan, which helps in visualizing the final result. Tip: Use spacers to maintain consistent gaps between panels to allow for expansion and contraction. Lay out the joists and mark their positions clearly on the subfloor to ensure accurate placement.
Once the framework is established, the installation techniques will significantly influence the overall look and durability of the floor. When securing the plywood, use screws instead of nails; this will reduce the chances of squeaking and provide a sturdy hold. Make sure to stagger the joints of the panels to enhance stability and avoid any weak points. Additionally, consider adding soundproofing materials between the layers for a more refined finish. Below is a quick reference table of essential tools and materials:
| Tools/Materials | Purpose |
|---|---|
| Plywood sheets | Surface material for flooring |
| Floor joists | Support structure for the raised floor |
| Screws | Secure the plywood to the joists |
| Level | Ensure even flooring |
| Measuring tape | Accurate measurement |

Finishing Touches: Enhancing Aesthetics and Functionality
Once the raised floor is installed in your garage, it’s time to focus on the details that elevate both aesthetics and functionality. Consider applying a durable epoxy coating or vinyl flooring to the surface of your new raised floor. This not only enhances the visual appeal but also ensures resistance to spills and stains. Use color schemes that complement your garage’s overall decor and lighting, making the space feel welcoming and organized. Additionally, incorporating rubber mats or area rugs in designated zones can provide extra comfort and grip, contributing to a safer work environment.
Another essential aspect is effective organization beneath the raised floor. Utilize the underfloor space to your advantage by incorporating storage solutions such as pegboards or wall-mounted shelves. This allows for easy access to tools and accessories while keeping the garage clutter-free. You can also install LED strip lights along the edges of the raised floor to enhance visibility, making the space both functional and visually striking. To keep everything tidy, don’t forget to include a small waste bin for quick disposal of scraps and debris.
| Enhancement Type | Benefits |
|---|---|
| Epoxy Coating | Durability & Easy Maintenance |
| Rubber Mats | Comfort & Slip Resistance |
| LED Strip Lights | Improved Visibility |
| Storage Solutions | Organized Workspace |
| Small Waste Bin | Quick Cleanup |
Q&A
Q&A: How to Build a Raised Floor in Your Garage
Q: What is a raised floor, and why would someone want to build one in their garage?
A: A raised floor is an elevated platform, typically built above the existing concrete slab. It can serve multiple purposes, such as creating additional storage space, improving insulation, or providing a level surface for various activities. Homeowners might opt for a raised floor to keep items off the damp concrete, improve aesthetics, or even create a more comfortable workspace.
Q: What materials will I need for building a raised floor in my garage?
A: To build a raised floor, you’ll primarily need wooden treated plywood or particle board for the surface, wooden beams or joists for support, concrete blocks for the foundation, and screws for assembly. Depending on your insulation needs, you may also want to include foam board or batting insulation.
Q: How do I determine the height of the raised floor?
A: The height of your raised floor largely depends on your purpose. Consider the space needed for electrical wiring, plumbing, or insulation. Typically, an inch or two above the existing floor is sufficient. However, if the raised floor will house storage, aim for a height that allows easy accessibility.
Q: Can I install a raised floor on an uneven garage floor?
A: Yes, you can install a raised floor on an uneven garage floor, but it may require additional work to level the platform. Using adjustable floor framing brackets can help achieve a level surface. Alternatively, shimming can also be employed to accommodate for any dips or rises in the existing floor.
Q: Is insulation necessary when building a raised floor?
A: While insulation is not strictly necessary, it is highly recommended, especially if your garage is attached to your home. Insulating the space can help regulate temperature, reduce moisture, and improve energy efficiency. Choose a moisture-resistant insulation material to combat potential dampness from the concrete slab.
Q: What’s the average time needed to complete this project?
A: The time required to build a raised floor in your garage can vary based on your skill level, the size of the area, and the complexity of the design. For a simple, straightforward setup, expect to spend a weekend. More ambitious projects could take several days, especially if additional features or customizations are involved.
Q: Do I need any special tools to build a raised floor?
A: Yes, you will need some basic carpentry tools including a tape measure, circular saw, drill, level, and potentially a sander for smoothing edges. A stud finder may also come in handy if you plan to attach your frame to the wall or existing structures for added stability.
Q: Is hiring a professional a good idea, or can I tackle this as a DIY project?
A: Whether to hire a professional or take on the project yourself depends on your comfort level and experience with DIY projects. If you have some carpentry skills and the necessary tools, a raised floor could be a rewarding DIY project. However, if the task feels overwhelming, consulting a professional can ensure your floor meets safety and building code standards.
Q: What finishing touches can I add to enhance the raised floor?
A: Once your raised floor is built, you can enhance it with various finishes. Consider painting or staining the surface for aesthetics, or adding a non-slip coating for safety. Additional touches could include decorative rugs, built-in storage solutions, or modular shelving to maximize usage of the space under and around the raised floor.
Building a raised floor in your garage offers a fantastic opportunity to transform the space into something more functional and organized. With the right materials and a bit of planning, you can create a solution that meets your specific needs. Happy building!
The Way Forward
As you embark on the journey of transforming your garage with a raised floor, remember that the process is as rewarding as the end result. A well-built raised floor not only enhances the functionality of your space but also opens up a realm of possibilities for organization, insulation, and style. Whether you’re looking to create a workshop, a storage haven, or simply a more versatile area, the steps we’ve outlined will guide you in making informed decisions and executing your vision.
Now that you have the tools and knowledge at your disposal, take a moment to ponder the future uses of your newly elevated garage. With some creativity and planning, your raised floor can become a haven for hobbies, a neat storage solution, or even a chic extension of your home.
So roll up your sleeves, gather your materials, and get ready to enjoy the satisfaction that comes with a job well done. Happy building!