how to install shower raised floor on basement rough in
08 Dec

When it comes to ‍transforming a basement into a functional⁤ and​ inviting space, ⁢the addition of a shower can⁢ be a game changer. Yet, for those venturing into the world of home renovations, the prospect⁤ of installing a shower raised floor can seem daunting. With the‍ correct preparation and ⁣guidance, however, this project can not only elevate your space but also⁤ enhance its practicality. ⁣In⁣ this article, we’ll walk⁣ you through the‌ essential steps to⁢ successfully install a ‍raised shower floor on your basement rough-in. Whether you’re⁣ a ⁤seasoned DIY enthusiast or​ a curious beginner, you’ll find tips, techniques, and insights to ⁤help you navigate this rewarding endeavor, turning your basement into a‌ refreshing oasis. So roll ⁤up your sleeves and let’s dive into the world of shower floor installation!

Table of Contents

Understanding the Basics of Shower Raised Floors in Basement ‌Installations

Understanding the Basics of Shower Raised Floors ⁣in Basement Installations

Shower raised floors are an innovative solution for ensuring effective drainage and waterproofing in basement environments. When installing, it⁢ is important to ⁤create a solid foundation by first preparing⁤ the subfloor. Key elements to consider for a successful installation include:

  • Height Considerations: Ensure the raised floor is at an appropriate height ​for the shower drain to function ‌properly.
  • Waterproofing: Use a‌ waterproof⁣ membrane ‌to‍ prevent moisture from seeping into the subfloor.
  • Drain Installation: Properly position and secure the drain to avoid ​potential clogs and water pooling.
  • Material Selection: Choose durable materials that can withstand ⁤humidity and temperature fluctuations.

Once you ⁢have established ‍the base, the next step⁢ is⁣ to install the raised ⁤floor components.​ Start by laying down the rigid ‍foam or pressure-treated plywood as the​ foundation for the floor system. Consider the following components in your construction:

Component Description
Framing Build a frame to elevate‌ the floor above‍ the ‍existing basement slab.
Insulation Add ‌insulation between the framing to improve thermal efficiency.
Floor Panels Install‌ waterproof floor panels that offer a solid surface for your shower.

By following these steps and considering the fundamental aspects, you’ll create a reliable and enjoyable shower space ‍in your basement that will stand the test of time.

Essential Tools and Materials⁢ for Seamless Installation

Essential Tools and Materials for Seamless Installation

To ensure a successful installation‌ of ‍your shower raised floor in a basement rough-in, assembling the right tools and materials​ is crucial. Start by gathering‌ essential hand tools that will make your work easier and more efficient.‍ These include:

  • Measuring Tape: For precise measurements ‌to ​ensure a snug ⁣fit.
  • Level: ‌ To⁢ ensure your floor is perfectly balanced.
  • Utility Knife: For cutting flooring materials to size.
  • Screwdriver Set: Essential for securing any fixtures.
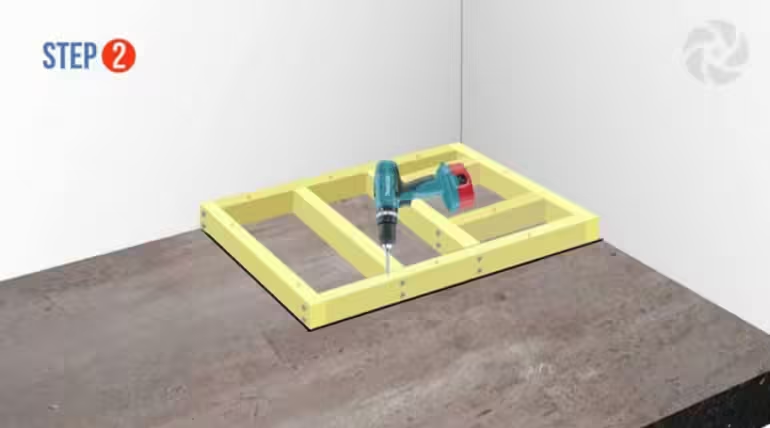
  • Drill ​and Bit Set: Useful for ​creating pilot holes and driving screws into challenging‌ materials.

In addition to tools, having the right materials at hand will streamline the‍ installation process. Make sure to include​ the following items in your list:

  • Raised Floor Panels: ⁢Choose panels designed for water resistance and durability.
  • Waterproof Membrane: ​Essential for preventing moisture build-up underneath the flooring.
  • Insulation Material: Helps with sound dampening and thermal regulation.
  • Sealant: For ⁤ensuring watertight fittings ⁣around⁣ edges and⁢ joints.
  • Backing⁢ Board: A reliable base for tiles or decorative finishes.

Step-by-Step Guide to ​Preparing the ⁤Rough-In for a Shower Raised Floor

Step-by-Step Guide to Preparing the Rough-In for a Shower Raised Floor

To begin ‌the rough-in preparation for‌ your shower’s raised floor, start‌ by selecting the‍ appropriate materials. Ensure you have PVC pipes, ‌ p-traps, and solid blocking ⁤ for the framework. The initial step involves sketching a layout‍ of the shower​ area, marking where the plumbing fixtures will be positioned. Utilize a level to guarantee⁢ that the ⁣ground is even, as‌ this will significantly affect water‍ drainage. Gather tools such as a reciprocating saw, ​ drill, and measuring tape ‌ to assist you in accurately shaping and installing the required components.

Next, measure the desired​ height of the raised floor and prepare to frame the foundation ​using pressure-treated​ wood to resist moisture.⁤ Make sure to install the drain assembly at the lowest point of your shower area, ⁢taking care to align it⁢ with the plumbing lines. Create a solid base using‌ plywood, ensuring it is ⁤securely mounted. For‌ further stability, you may choose to ‌add diagonal ⁣braces in the framework. Once the floor is framed, it’s⁢ time to lay⁤ down waterproofing⁢ membranes ​to protect against potential leaks, ensuring all⁢ seams are thoroughly sealed and adhered to prevent water penetration.

Tips for Ensuring Drainage ⁢and Preventing Water Damage on Raised Floors

Tips for Ensuring⁤ Drainage and ⁢Preventing ⁢Water Damage on Raised Floors

To prevent⁤ water damage when installing a raised shower floor, it’s vital to‍ prioritize proper drainage. Begin by ​ensuring that⁢ the slope​ of the subfloor ‍directs water towards the drain. This can be achieved‍ by ‌using self-leveling compound to create a gradient. Additionally, selecting the right type​ of drain is crucial;⁣ a linear drain can provide a sleek​ aesthetic while effectively managing water flow. Incorporate a waterproof membrane beneath the floor tiles to⁤ create ⁣an added layer of protection against moisture infiltration. Consider‍ implementing the following practices:

  • Regularly inspect‍ the drain for clogs and debris.
  • Utilize high-quality materials that withstand moisture exposure.
  • Seal any ​seams or joints with waterproof sealant to ‍prevent leaks.

Monitoring and maintaining the drainage system should be an ​ongoing commitment. Implement a maintenance schedule‌ to check the‌ performance ⁤of‍ the drainage system and inspect the surrounding area for signs of moisture accumulation. It’s ⁤also beneficial⁢ to ⁤include a ⁤ drainage mat or grid below the ​raised floor to allow any⁣ water that may seep through ​to flow directly to the‌ drain rather than becoming trapped. A straightforward drainage system checklist can help keep track of inspections and upkeep:

Task Frequency
Inspect for ⁣clogs Monthly
Check waterproof seals Every 3 months
Clean drain strainer Weekly
Evaluate condition of ⁣tiles Biannually

Q&A

Q&A: How to Install a Shower ⁣Raised Floor on a ‌Basement Rough-In


Q1: What⁣ is a raised floor, and why would I want one in‍ my basement shower?
A1: A raised floor is ⁣an elevated⁣ platform‌ that facilitates proper drainage and ⁢plumbing for your shower‍ setup. Installing a ​raised floor in your basement shower helps prevent water from pooling, ensures better drainage, and allows access to plumbing beneath the surface. It also helps combat⁢ moisture⁣ issues common in basement areas.


Q2: What materials⁢ and ​tools will I‍ need to get started?
A2: ​ To successfully install your ⁢shower raised floor,‍ you’ll need:

  • Pressure-treated lumber or engineered wood for the frame
  • Plywood or ‌cement⁤ board for the⁣ floor surface
  • Water-resistant ⁤adhesive
  • Leveling compound (if needed)
  • A saw ‍(circular or miter)
  • Drill and screws
  • Measuring tape
  • A level

You might ⁣also‍ want safety gear, such as goggles and gloves, to protect yourself while working.


Q3: What are the ​initial steps before beginning ⁤the installation?
A3: Start by measuring the area where you’ll install the ⁣shower. Ensure that you have a proper understanding of your basement’s plumbing and drainage systems.⁤ A rough-in should already ⁣exist—this is where you will connect the shower drain. Once you’ve marked the area, ensure the ‍space​ is clean and dry⁣ to facilitate a smooth installation process.


Q4: How do I build the frame ​for the raised floor?
A4: Begin by⁢ cutting your pressure-treated lumber to create​ a rectangular frame that matches your shower⁢ dimensions. Ensure to ‌include support beams at intervals of 16 ​inches⁢ or according to your local building codes. ‌Use a level to ‌check that the frame is even ⁤and make adjustments if necessary. Secure it to the floor with screws and make ‌sure it’s ‌stable before proceeding.


Q5: Once the frame⁢ is complete, how do ⁣I ⁣install the floor surface?
A5: After your ‍frame is ‌secure and stable, lay down your plywood ⁢or cement board on⁤ top, ensuring it‌ sits flush against the frame. Cut the material to ‌fit around the shower drain, making sure the flooring slopes slightly towards it to promote proper drainage. Use water-resistant adhesive along with screws to secure the surface firmly.


Q6: Are there any finishing touches or precautions I should take?
A6: Absolutely! Once the ⁤raised floor is‍ in place, ​consider ‍applying a‍ waterproof membrane over the surface for extra protection against moisture. This‌ layer helps prevent water damage beneath the flooring. check all connections to ⁤plumbing‍ and ensure everything is sealed ⁢well to avoid leaks. ​


Q7: How do I know if my raised floor installation was successful?
A7: ⁤After installation, it’s essential to test the ​drainage. Pour water into⁣ the shower area and check for proper runoff. ‍There should be no ⁢pooling, and ⁣the water should ⁢flow seamlessly towards the‍ drain. Additionally, ⁢verify that the surface is sturdy and ⁤stable, ensuring it can handle daily wear and tear.


Q8: Is it necessary to hire a​ professional, or can I do this installation ‌myself?
A8: While ⁤some homeowners may feel confident tackling this project themselves, it’s ultimately a matter ⁢of comfort​ and skill level. If you’re familiar with basic⁢ construction and plumbing, you‌ can likely complete it on ⁤your own. However, if you’re unsure or want peace ⁣of mind, it’s advisable to consult or hire a professional to ensure the job is done right.


By following ​these guidelines, you’ll be well⁣ on⁤ your‌ way ‌to installing a beautiful and functional raised floor for your basement shower. Enjoy your project!

Final Thoughts

As we wrap up our⁢ guide on installing a shower raised floor on a basement rough-in,⁣ we hope you feel empowered and prepared to tackle this project with confidence. Transforming your‍ basement into a functional, inviting space not only enhances your home’s value⁤ but ‍also elevates‍ your daily routines. Remember, ‍patience and precision are your best allies throughout this journey.

From selecting the ⁤right⁢ materials⁤ to​ ensuring a watertight seal, each step contributes to a⁤ successful installation.​ Don’t hesitate ‍to refer back to this guide ⁤as you work through⁢ the nuances‍ of the process,‍ and ⁢remember‌ that every‍ endeavor​ is an‍ opportunity to learn and ‌refine your⁤ skills.

With a little determination⁢ and ‍the right‌ tools in hand, you’re well on your way to enjoying your new shower space, completely tailored to your home and lifestyle. Happy renovating!

Leave a Comment